The Manage Services section of the Hub dashboard is the place where you can manage all your Experience and Space listings. You can upload new listings by clicking the “Offer services” option in the dropdown menu, or the “Add an Experience” / “Add a Space” button in each subsection respectively. The existing listings can also be accessed via the “Experiences” and “Spaces” quick tabs in the “Overview” section.
In this article, we will be focusing on the Experiences subsection as the Spaces one’s interface and functionality works in the same manner.
Overview of listings
All your existing listings are reflected as a table. Each row contains such information as your respective Experience’s title, host, date created and last modified, approval status, featured status (pin), and additional actions under the 3 dots.
The left sidebar enables you to filter Experiences according to their approval status:
All – shows you all Experiences you ever listed.
Active – only shows you the Experiences that are live on the platform.
Under review – reflects the Experiences pending our team’s approval.
Drafted – shows the listing drafts that are yet to be completed and published by you. The actions for this status are limited, and you can only continue editing or delete the respective Experiences.
Backlog – reflects those Experiences which have been either unlisted by you or archived by our team. Please note that you can edit and list once again the Experiences unlisted by you, however you can’t do the same with the Experiences archived by our team (submit your request via team@mereka.io if you need to unarchive any of them).
The “Add an Experience” button below the sidebar allows you to add new services as well.
What actions can you perform with your listings?
The top bar above the listings table allows you to search for relevant services by typing their title. It is also possible to export all your listings in bulk as a CSV file that can be viewed via Excel or Google Sheets, and embed your Experiences to external websites with the use of auto-generated code.
Here is how to embed an Experience:
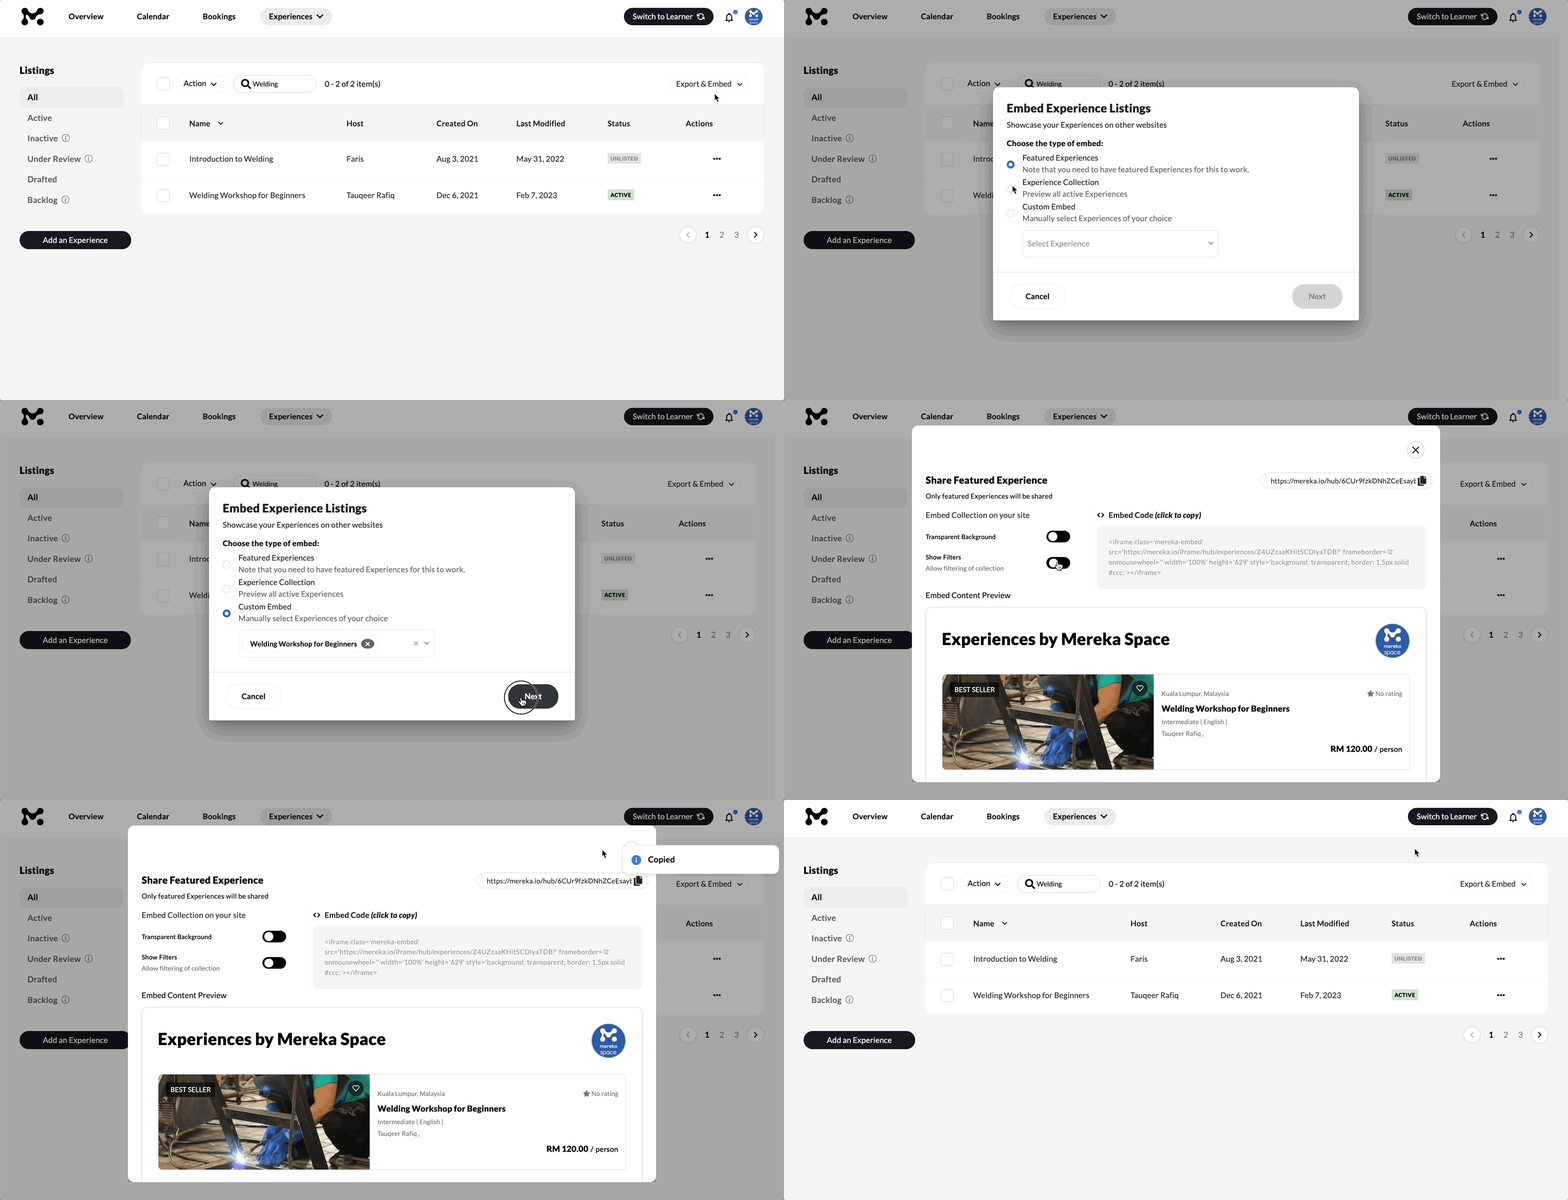
On the “Experience” tab of the “Manage Services” section, click “Export & Embed”.
Press “Embed Listings”.
Choose whether you want to embed Featured Experiences, your entire Experience Collection, or only select Experiences of your choice, and then press “Next”.
You can now copy the provided embed code by clicking on it – upon doing so, a notification should pop up in the top right corner of the screen confirming your action. On this window, you can also toggle options for transparent backgrounds or filters and be able to preview the embed content.
Once you have copied the embed code and confirmed your settings, you may press the button in the top right corner of the pop-up window to exit it.
You can now paste the copied embed code where desired to embed your Experiences!

Apart from searching for, exporting and embedding your listings, there are numerous other actions available to you as a user. All of them are nested under the “Actions” column of the table and can be accessed by clicking the 3 dots.
Manage Listing – redirects you to a separate page where you can edit the Experience (by clicking the black “Edit Experience” button at the top right corner); view Experience analytics (sales, bookings, page views, shares and favorites); view the publicly available Experience page; add and edit hosts and collaborators; review upcoming, past and canceled bookings.
Edit – redirects you straight to the Experience upload form so you can update all the information you need.
View Page – redirects you to the publicly available Experience page.
Share Page – allows you to copy the link to your Experience and share its details on social media.
Feature/Un-feature – allows you to pin/un-pin your listing in the Hub profile. That way only the featured services would be reflected on the publicly available Hub page.
List/Unlist – allows you to either unlist the Experiences that are active (e.g. if you’re no longer running them), or list previously unlisted Experiences (e.g. once you’ve updated the details and confirmed the new dates).
Delete – this action is only applicable to Experience drafts, e.g. if you no longer want to list an Experience on the platform.
Please note that no actions will be available for the Experiences that have been archived by the Mereka Connect admins. If you need help unarchiving those Experiences or require any other assistance with your listings, please contact us via team@mereka.io.