Hosts are an integral part of any Experience on Mereka Connect. Their skills and expertise are what make our Experiences engaging and fun! Our platform’s extensive functionality also enables Experience creators to invite Collaborators so that Hosts are not alone in their mission to spread knowledge and creativity.
This article is your step-by-step guide on how to add both Hosts and Collaborators to any of the Experiences listed under your Hub.
How do I add Hosts to my Experience?
Hosts can either be added via the Experience form or “Manage Listing” page. It is possible to add up to 3 Hosts to your Experience.
To add Hosts via the Experience form:
Navigate to the form by either clicking “Add a Service” → “Experience” in the “Overview” section of the Hub dashboard, or “Manage Services” → “Offer Services” → “Experience” on the top bar of the dashboard.
Scroll to the very bottom of the “Your Experience” tab of the form, and locate the “Host” section.
Choose your Host from the dropdown menu and define their access. Note that the Hub owner would always have full access to the Experience functionality.
A. If your Host is an existing Hub Expert, choose their name from the list and select their permissions (Full Access, Export Only, or View Only). It is possible to edit the information about the Host in this case, but not their name or email. Once you’ve populated all the details, click “Save Host”.
B. If your Host is a team member from another Hub registered on Mereka Connect, scroll to the bottom of the menu and select “Choose from Other Hubs”. The Hubs and their Experts would be available in the 2 emerging dropdowns. Don’t forget to set their access permissions and click “Save Host”!
C. If you want to add a new Host who isn’t registered on Mereka Connect, scroll to the bottom of the menu and select “Add New Host”. Define their access, input their name, email and populate the “About the Host” section. It is also necessary to upload their profile image. Once you’ve filled in all the sections, click “Save Host”.
It is possible to add more Hosts (up to 3) by clicking the plus sign. All Hosts you’ve added would receive an invitation email in their inbox, including those who don’t have a profile on the platform just yet.
To remove a Host you can either click the bin icon at the top right corner, or click “Remove Collaborator” at the bottom of the Access menu. To edit the Host details, all you have to do is click the pencil icon at the top right corner.
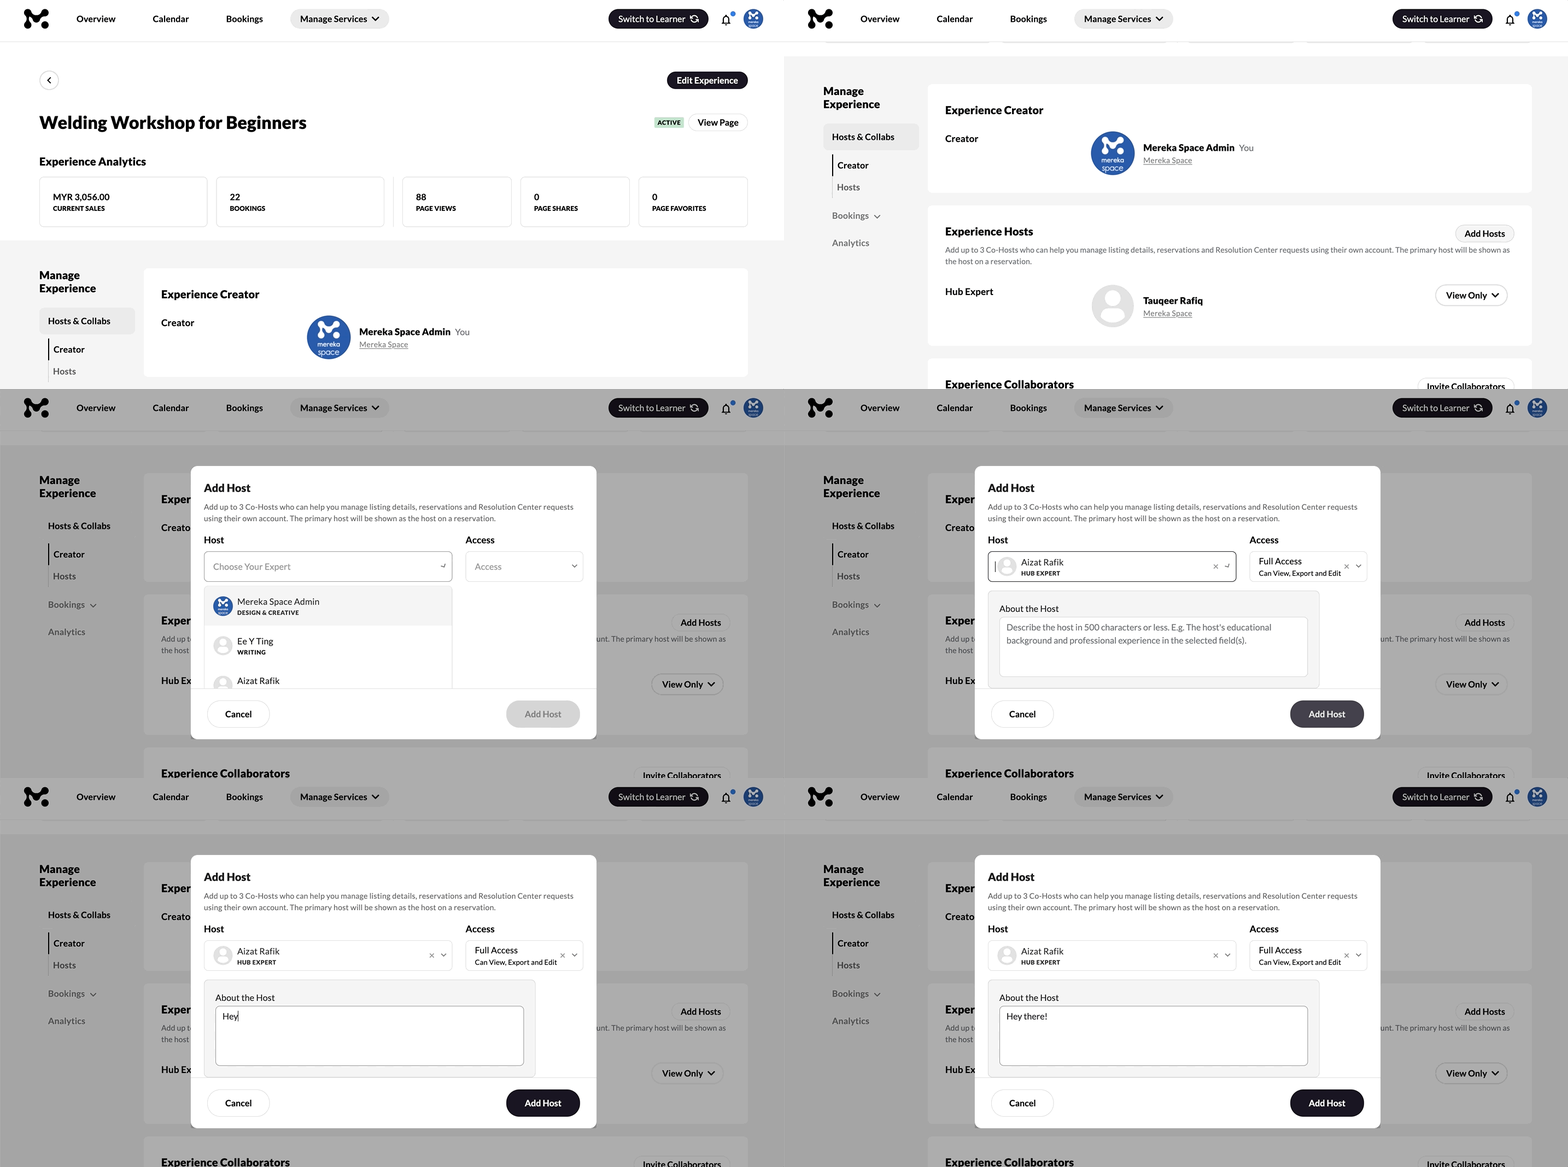
To add Hosts via the “Manage Listing” page:
From the Hub dashboard, navigate to “Manage Services” → “Experiences” and choose your respective listing.
Navigate to the three dots under “Actions” and select “Manage Listing”.
Scroll down and locate the “Add Hosts” button.
You can choose to add either a Hub Expert, external Host from another Hub or a new Host similarly to how you would via the Experience form. Once you’ve populated all the details, click “Add Host”.

Please note that you can only add up to 3 Hosts. It is also possible to change access of the current Hosts and remove them by clicking the access dropdown menu and choosing your preferred option.
What is a Collaborator, and how do I add one to my Experience?
A Collaborator is an external user (i.e. is not your team member) who is involved in managing a particular service. An unlimited number of collaborators can be added to one Experience!
To invite Collaborators:
From the Hub dashboard, navigate to “Manage Services” → “Experiences” and choose your respective listing.
Navigate to the three dots under “Actions” and select “Manage Listing”.
Scroll down and locate the “Invite Collaborators” button.
Type in their email address or user name (in case they are already registered on the platform and belong to another Hub), and press Enter.
Select their permissions (Full Access, Export Only or View Only). Giving your Collaborators full access allows them to edit the Experience.
You can also type a welcome message to inform them of your wish to make them a Collaborator for your Experience.
Once you’ve populated all fields, click “Invite”. An invitation email will be sent to their inbox.
All your invited and current collaborators will be visible on the “Manage Listings” page, as well as in the “Users” tab of the Hub Settings section.
Collaborators can only have access to the services they have been assigned to, and do not have access to the rest of the Hub dashboard. By default, they can see the “Overview”, “Calendar”, “Bookings” and “Manage Services” tabs of the Hub dashboard with the data related to their assigned services only.
Collaborators do not have access to:
Hub settings & finances
Adding new services
Inviting new team members and collaborators
However, it is always possible to switch their role to “Expert” via the Hub dashboard and give them access to other services. To do that, simply go to Settings → Users → Team Members → Collaborators and click the “Collaborator” dropdown next to their name. You will see an option to convert them to an Expert and expand their permissions list.

To remove a Collaborator, click the “Remove Collaborator” option in the same dropdown menu or go to the “Manage Listing” page, locate the Access dropdown menu next to the Collaborator’s name and click “Remove Collaborator”.
Read this to learn more about other types of users and roles on Mereka Connect. If you have any additional questions, do not hesitate to reach out to us via [email protected].