A complete walk-through of the Experience upload process.
Hosting your first Experience? Here’s a step-by-step guide to help you get started.
Quick tips before you begin:
You need to create your Hub profile or join a Hub by invitation first before proceeding with the Experience listing. Learn more about adding a Hub on Mereka Connect here.
You may track your application progress by looking at the top bar of the page.
You may always save your application even if it’s not 100% complete and come back to it later. All you need to do is click “Save and Exit” at the bottom of the page.
We recommend you read our FAQs alongside this article, so that each step of your Experience onboarding process runs smoothly!
Getting started
Go to mereka.io and sign in to your Mereka Connect account.
Click the button with your Hub’s name on it.
On the dashboard, click the “Add a Service” button, or alternatively navigate to “Manage Services” → “Offer services”.
Select the “Experience” card.
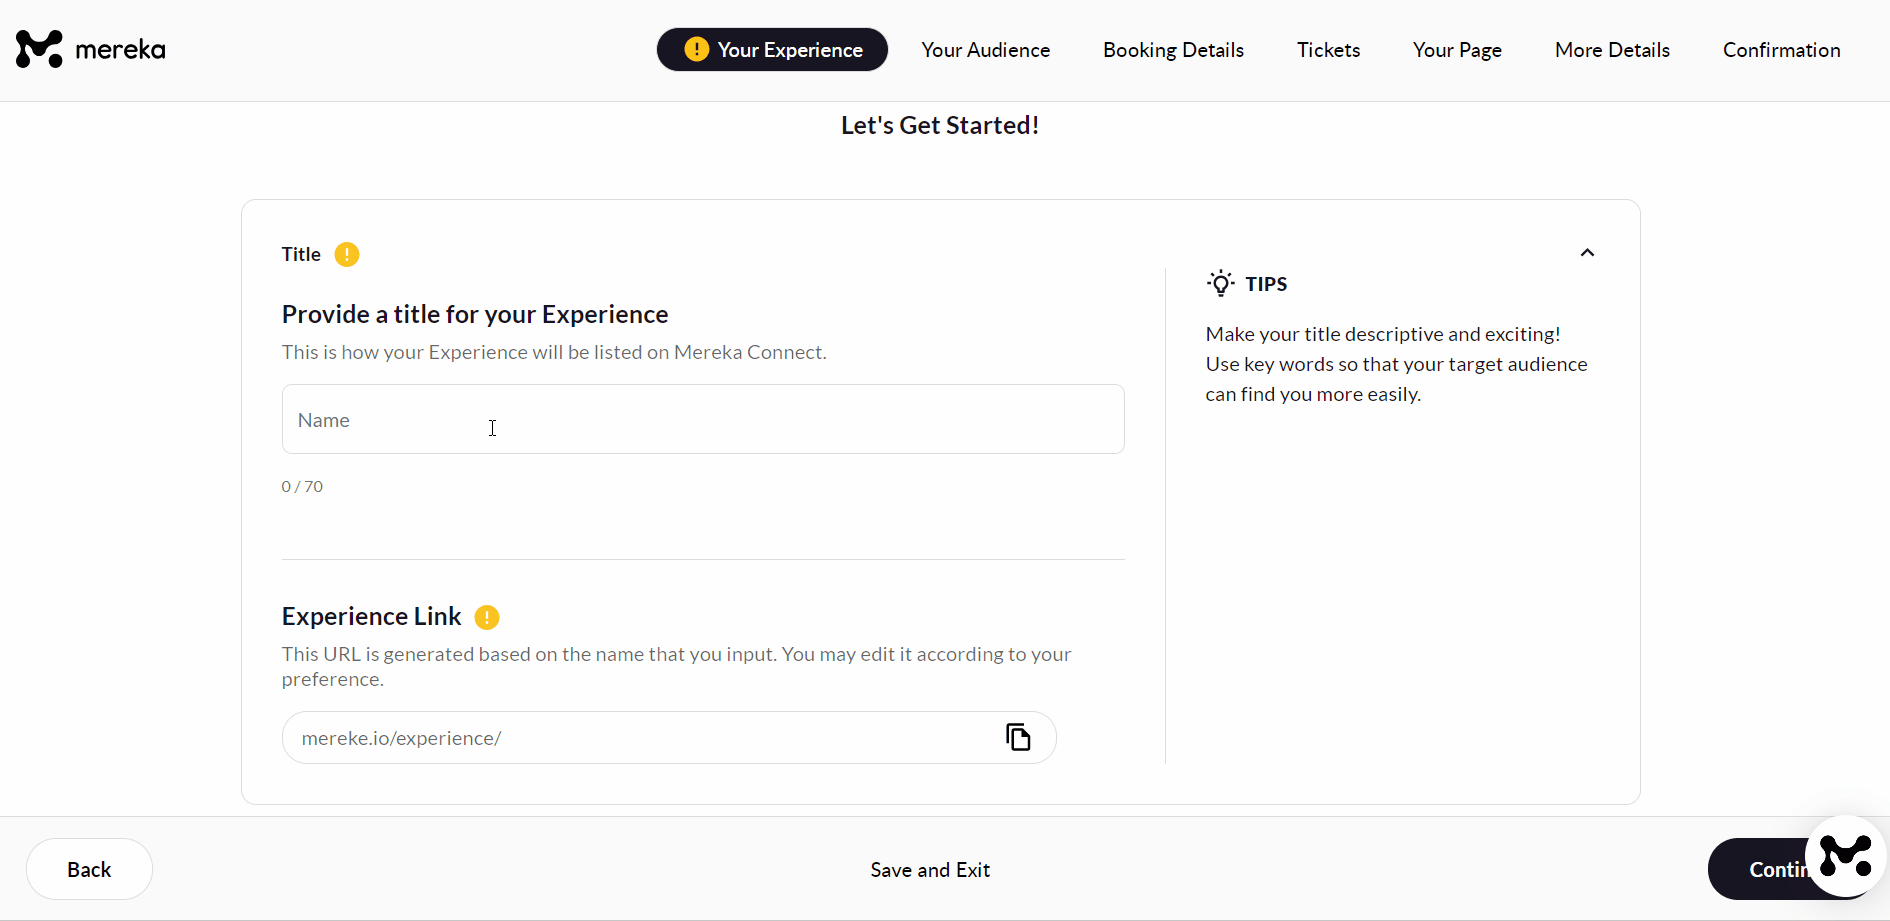
Experience Title
Give your Experience a title. This is how your Experience will be listed on our platform so make sure your title sparks your users’ interest!
The Experience Link itself will be auto-generated based on the Title you provide. However you may change it according to your preference!
Experience Category
Select the type of Experience that you will be offering
Themes & Topics
After choosing your main category, you will be able to add up to 3 themes & topics to describe your Experience by clicking the “Add Theme +” button.
Select the main theme of your Experience from our range of options.
Select a topic within your preferred theme. If the topic you’re looking for isn’t available, you can add your own topic by click the ‘Other’ option
If you’d like to add more themes, or simply add extra topics within one theme, you may do so by clicking the “Add Theme” box. If you wish to edit or delete either your themes or topics, just click on theme or the ‘x’ icon next to it.

Experience Mode
Choose the way your Experience will be conducted, either “Physical” or “Online” (for virtual Experiences).
The default selection will be “Physical”, but if you select “Online”, the Location section below will be replaced with fields where you can input the meeting link, as well as the location you will be conducting the Experience from. Please note that Mereka Connect is not an LMS, hence we do not host video content within the platform – you’d have to do it via external tools and software
When a user books an online Experience, the meeting link you inputted will be sent in their booking confirmation email and will also be in their Booking Details for them to access.
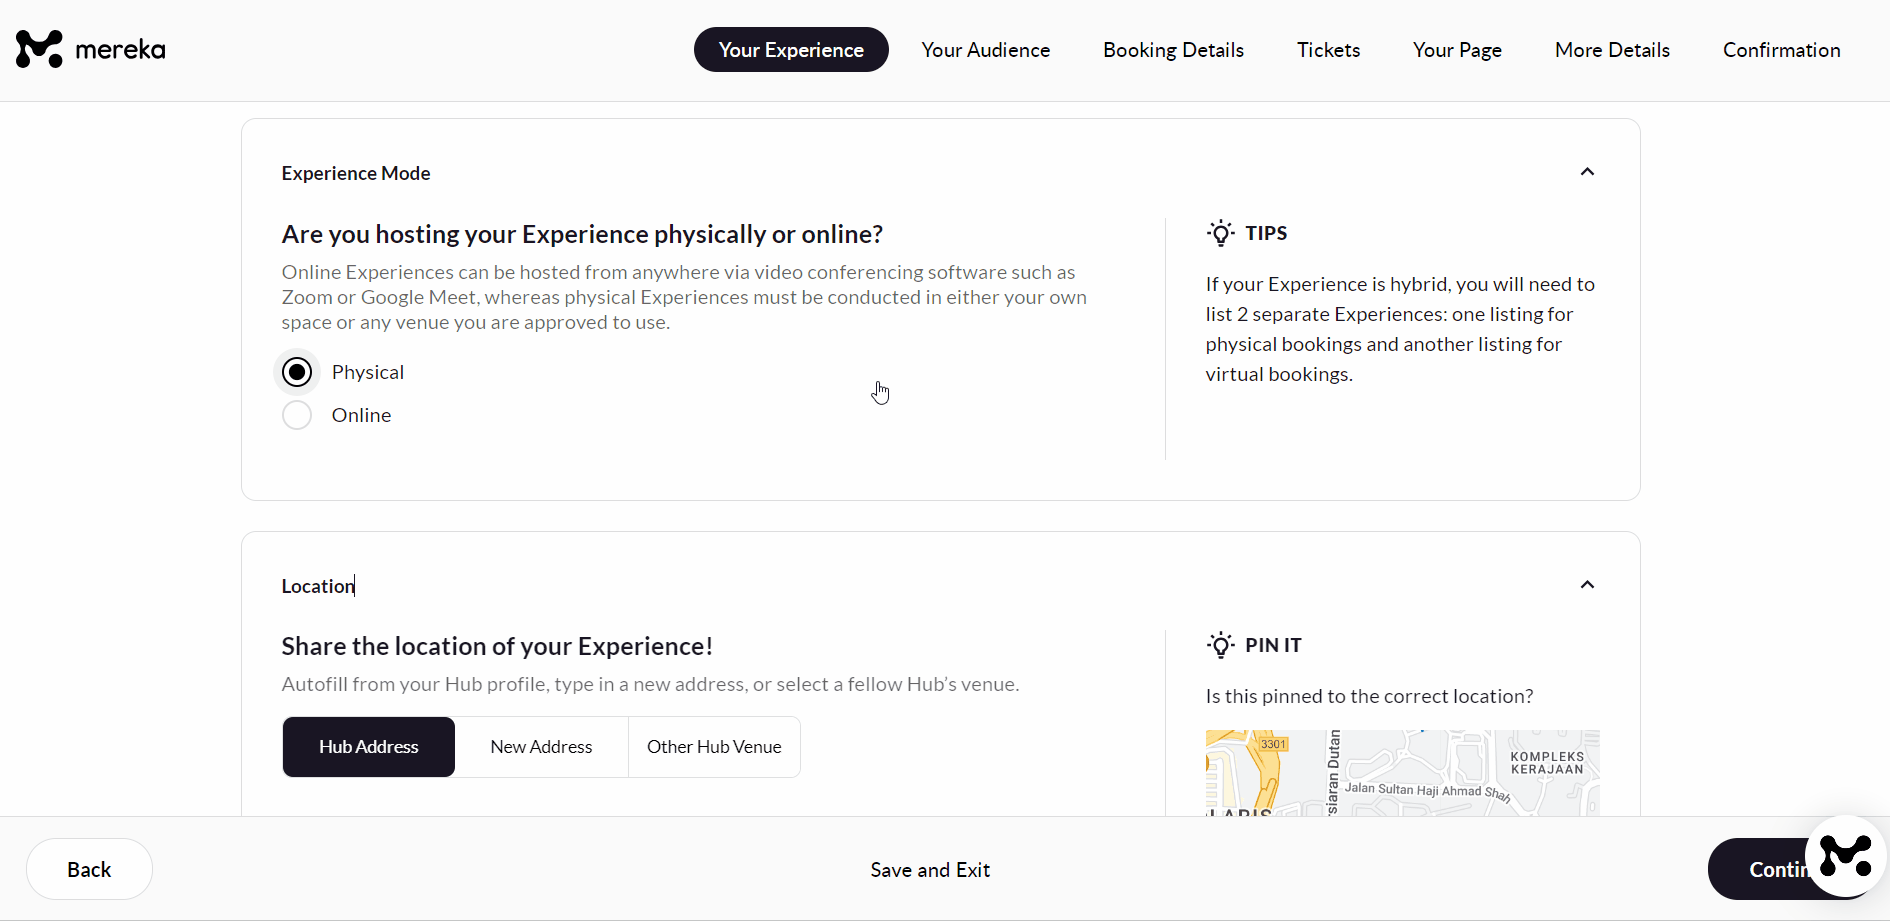
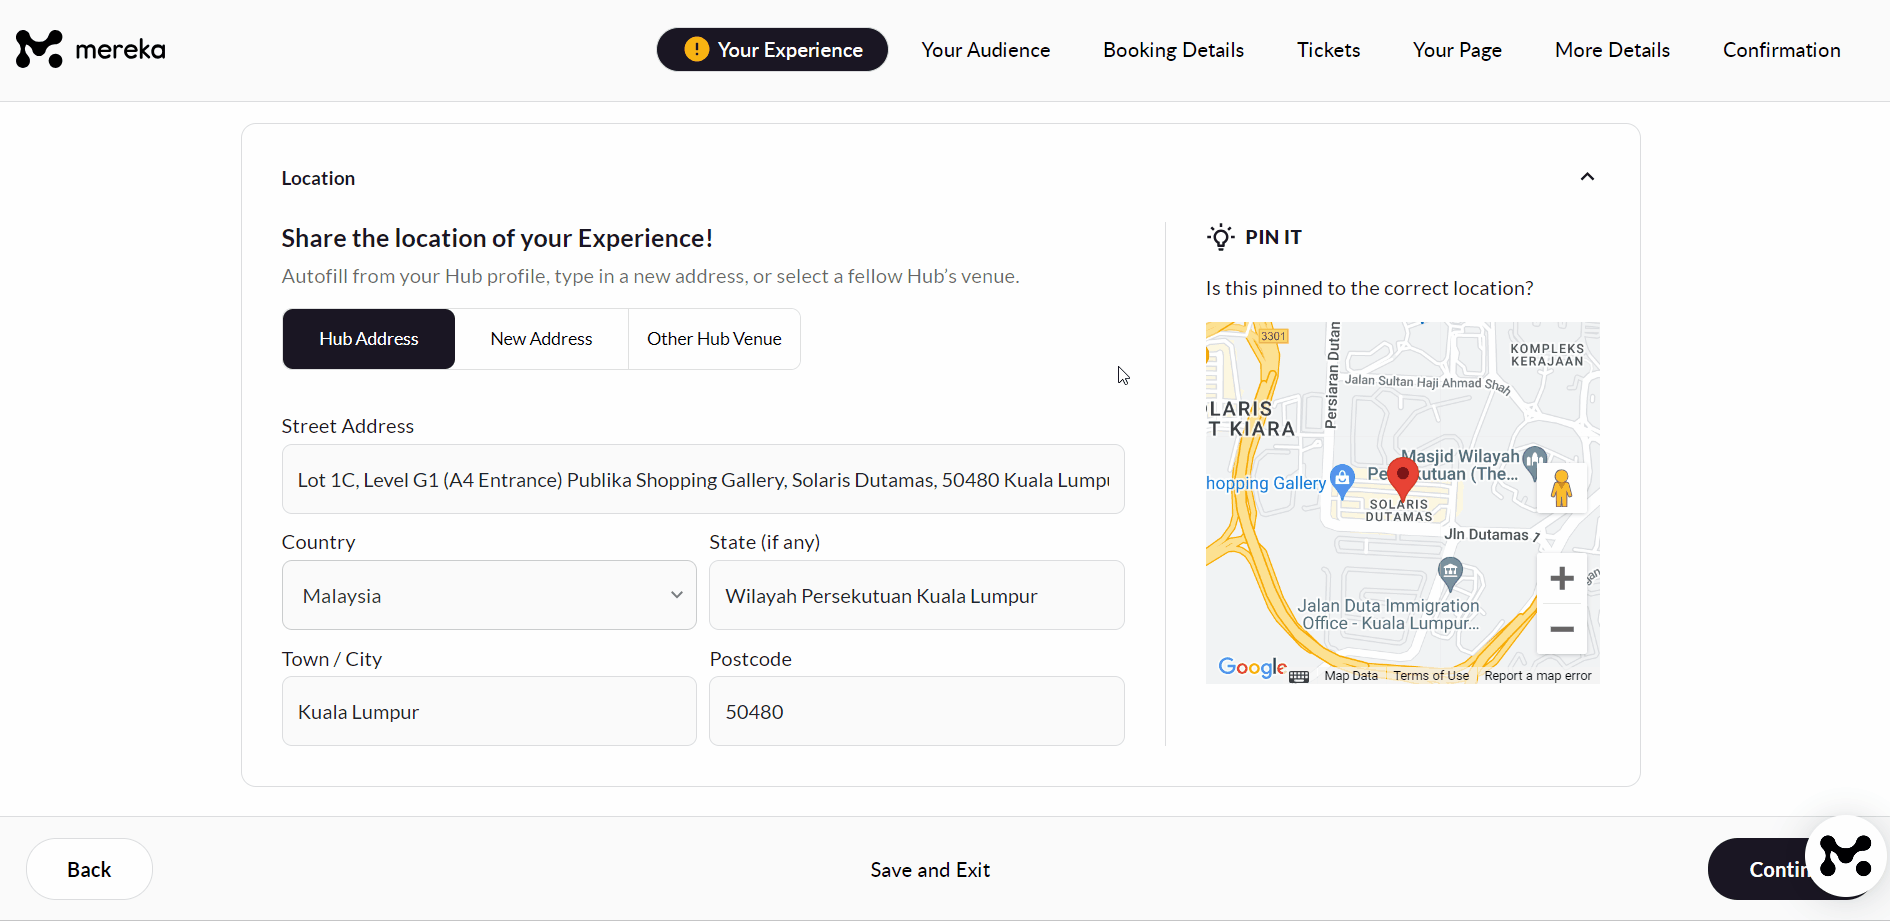
Location
This Location section will only be applicable for Physical Experiences
By default the Location of your Experience will be your current Hub Location, however, if the Experience is happening in a different address, you may switch to the “New Address” tab and key in the information there.
If this is a collaboration with another Hub, you can switch to the “Other Hub Venue” tab and select another Hub that’s on our platform as the location.
Hosts
A Host for an Experience can be either:
Your own team members (Experts),
Experts of other Hubs, or
External users who aren’t registered on Mereka Connect (“Add New Host” option)
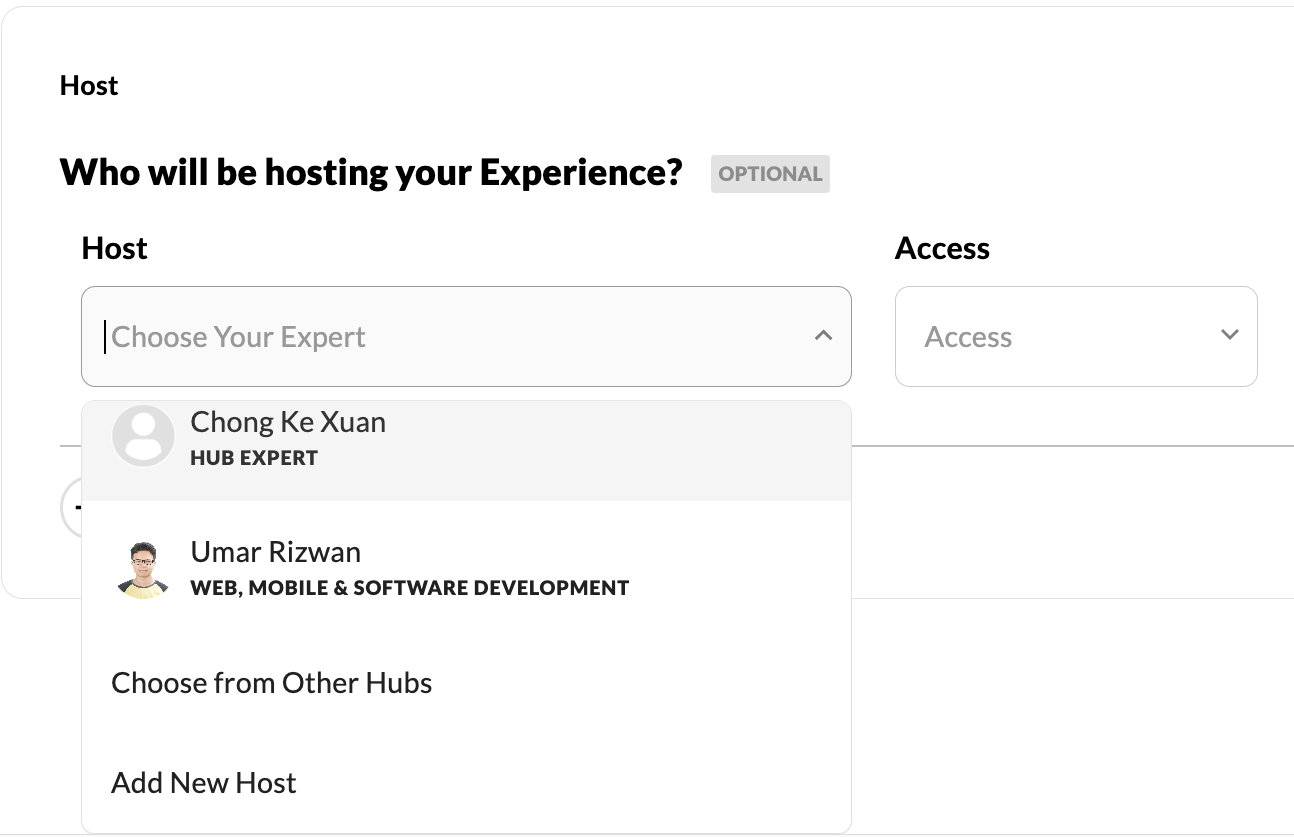
You can add up to 3 Hosts to your Experience and you can set their access level between “Full Access”, “Export Only”, “View Only”. To learn more about the process, follow this link.
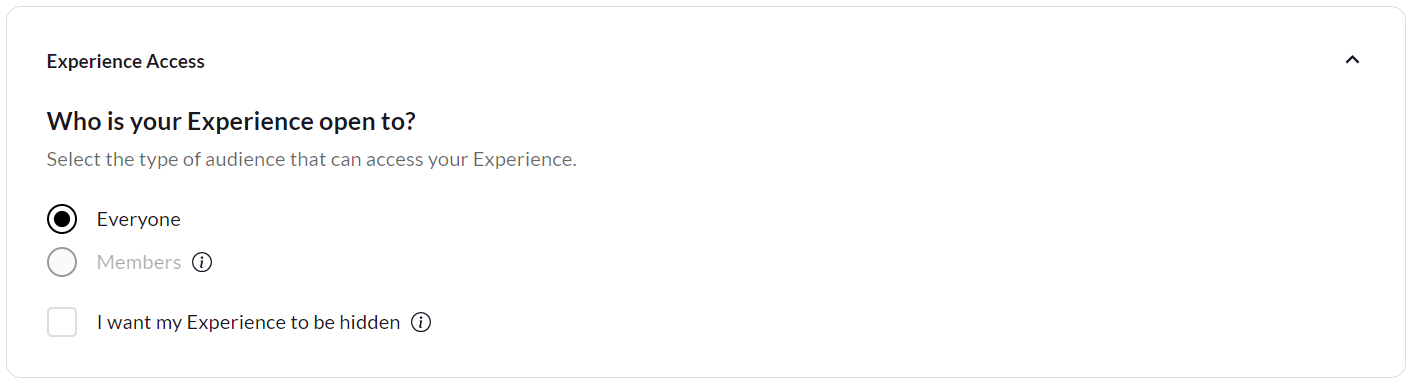
Experience Access
A Members feature is currently in the works! When it goes live, you can indicate who your Experience is open to by selecting either “Everybody” or “Members” in this section. Alternatively, you may choose your Experience to be hidden, which means that it won’t be on the Mereka Connect homepage, your Hub Profile, and it won’t be searchable. Only users with a direct URL would be able to access it.
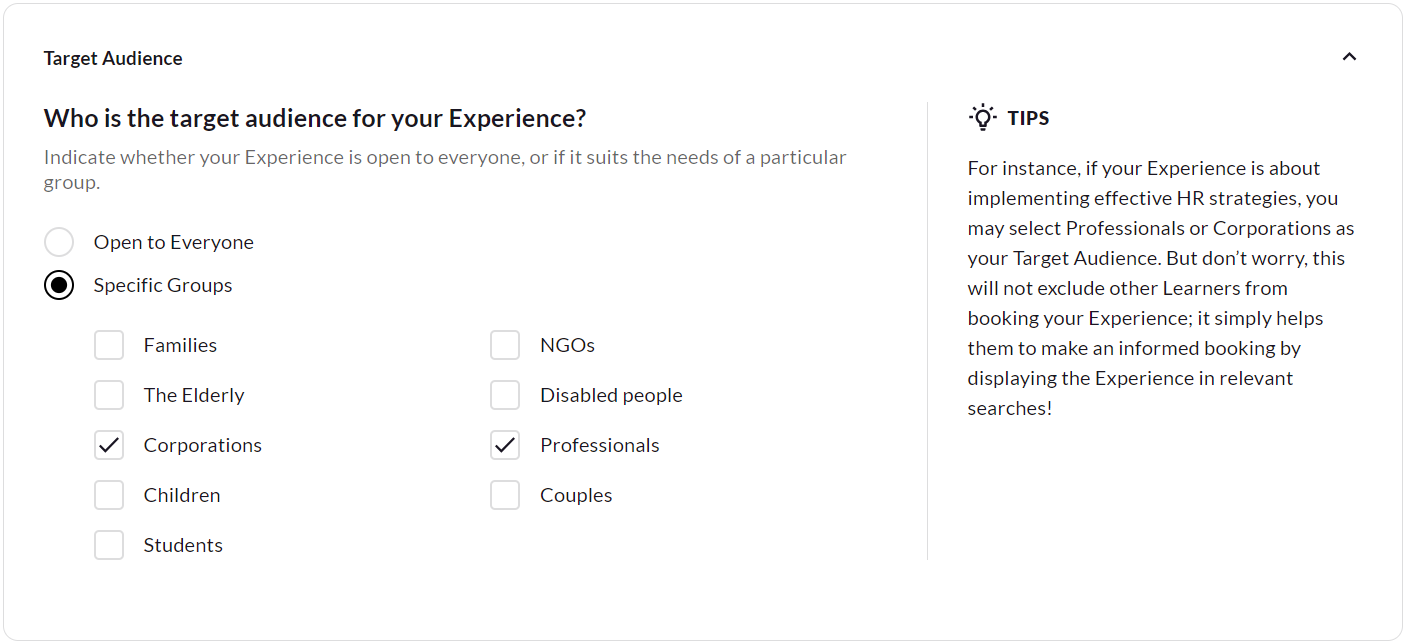
Target Audience
If you have a specific audience group that you’d like to target, you can select the “Specific Groups” option and check the box on the audience that is relevant to your Experience. You may select as many boxes as you require (Do note that the target audience doesn’t stop users who don’t fit the audience group to book the Experience, it acts as more of a guideline to let users make an informed booking).
If you don’t have a specific audience you want to target, you can just leave the option to “Open to Everyone”.
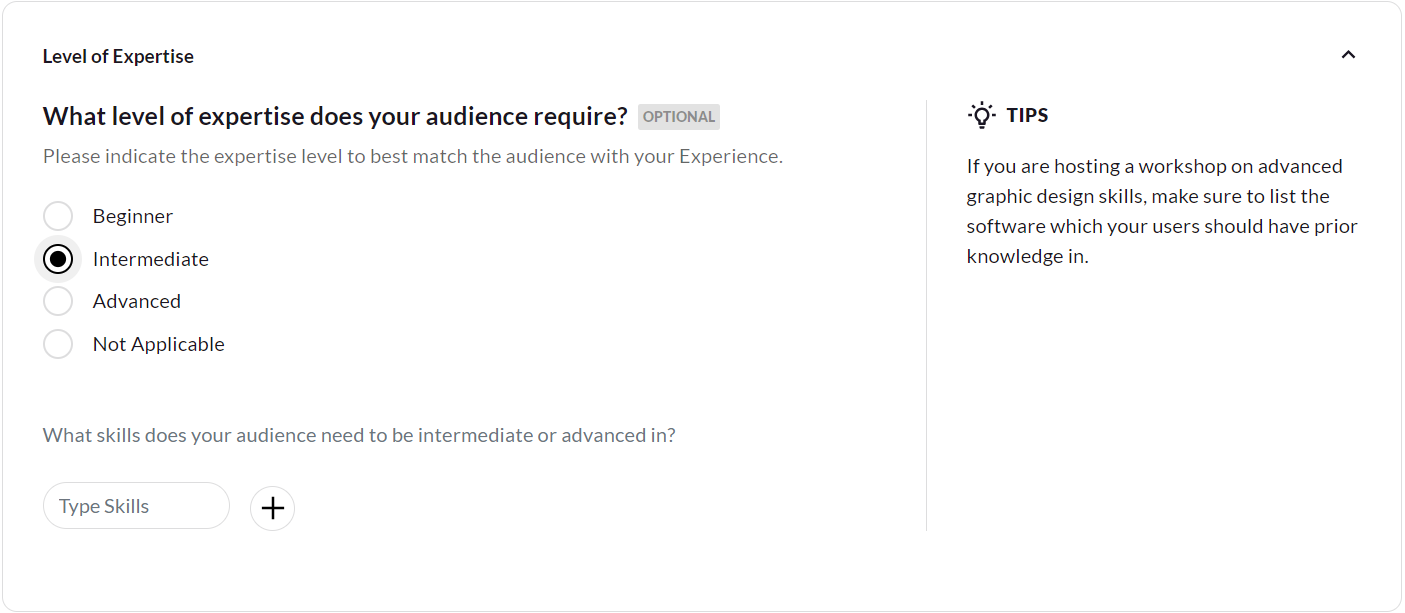
Level of Expertise
Indicate the level of expertise you require from your users by selecting either “Beginner”, “Intermediate” or “Advanced”. In case your users need to be Intermediate or Advanced in certain skills, please outline them in the designated field (you may add multiple skills by clicking the plus sign). If there are no levels of expertise required for your users, you may select the “Not Applicable” option.
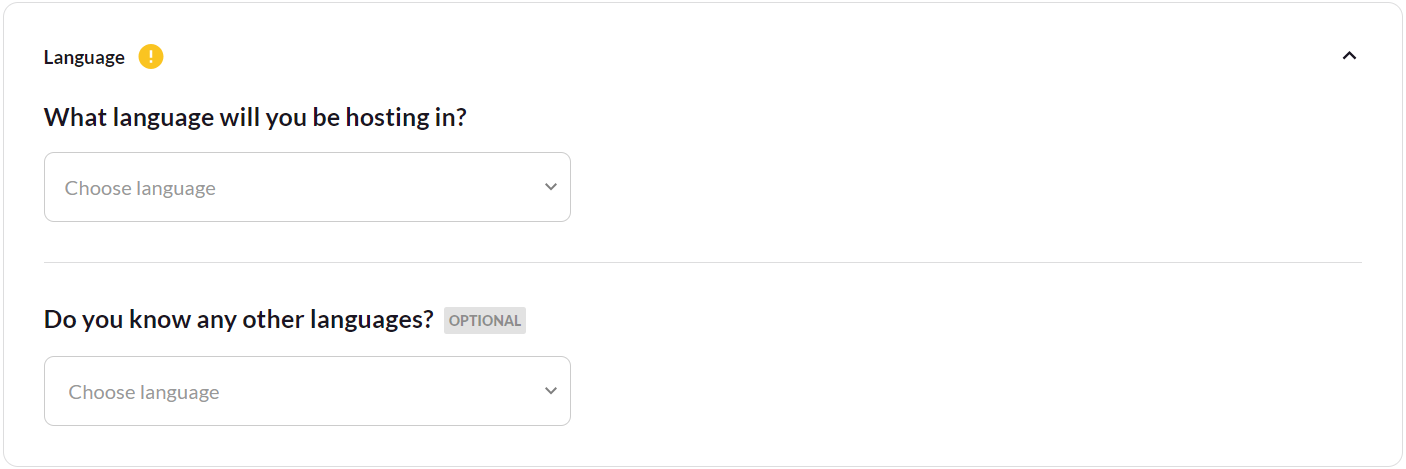
Language
Choose the main language you will be hosting the Experience in.
Optionally, you can include any other languages that you know as well.
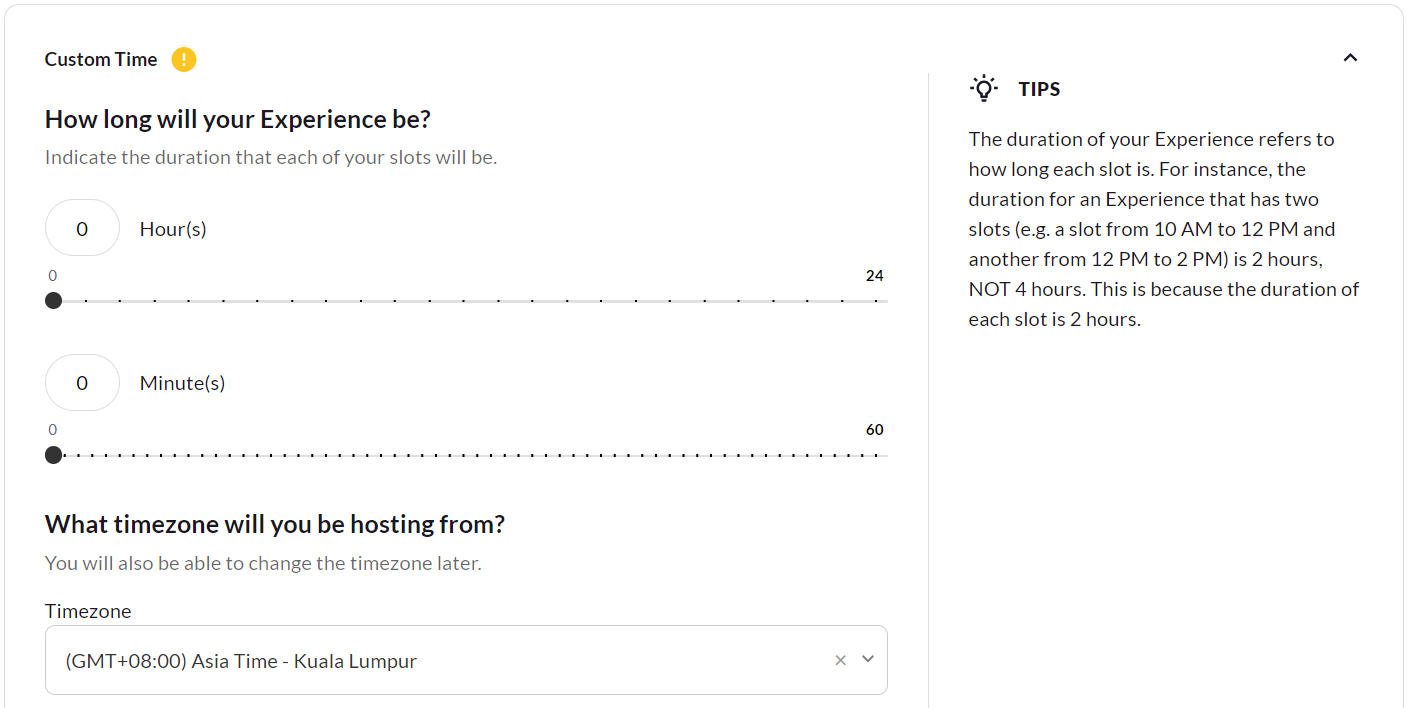
Duration and Time
Choose the duration of your Experience by typing in the Hour(s) and Minutes(s), or by moving the slider accordingly. Note: The duration of your Experience refers to how long each session is. For instance, the duration for an Experience that has two sessions (e.g. a session from 10 AM to 12 PM and another from 12 PM to 2 PM) is 2 hours, NOT 4 hours. This is because each session is 2 hours long.
Indicate the timezone from which you will be hosting.
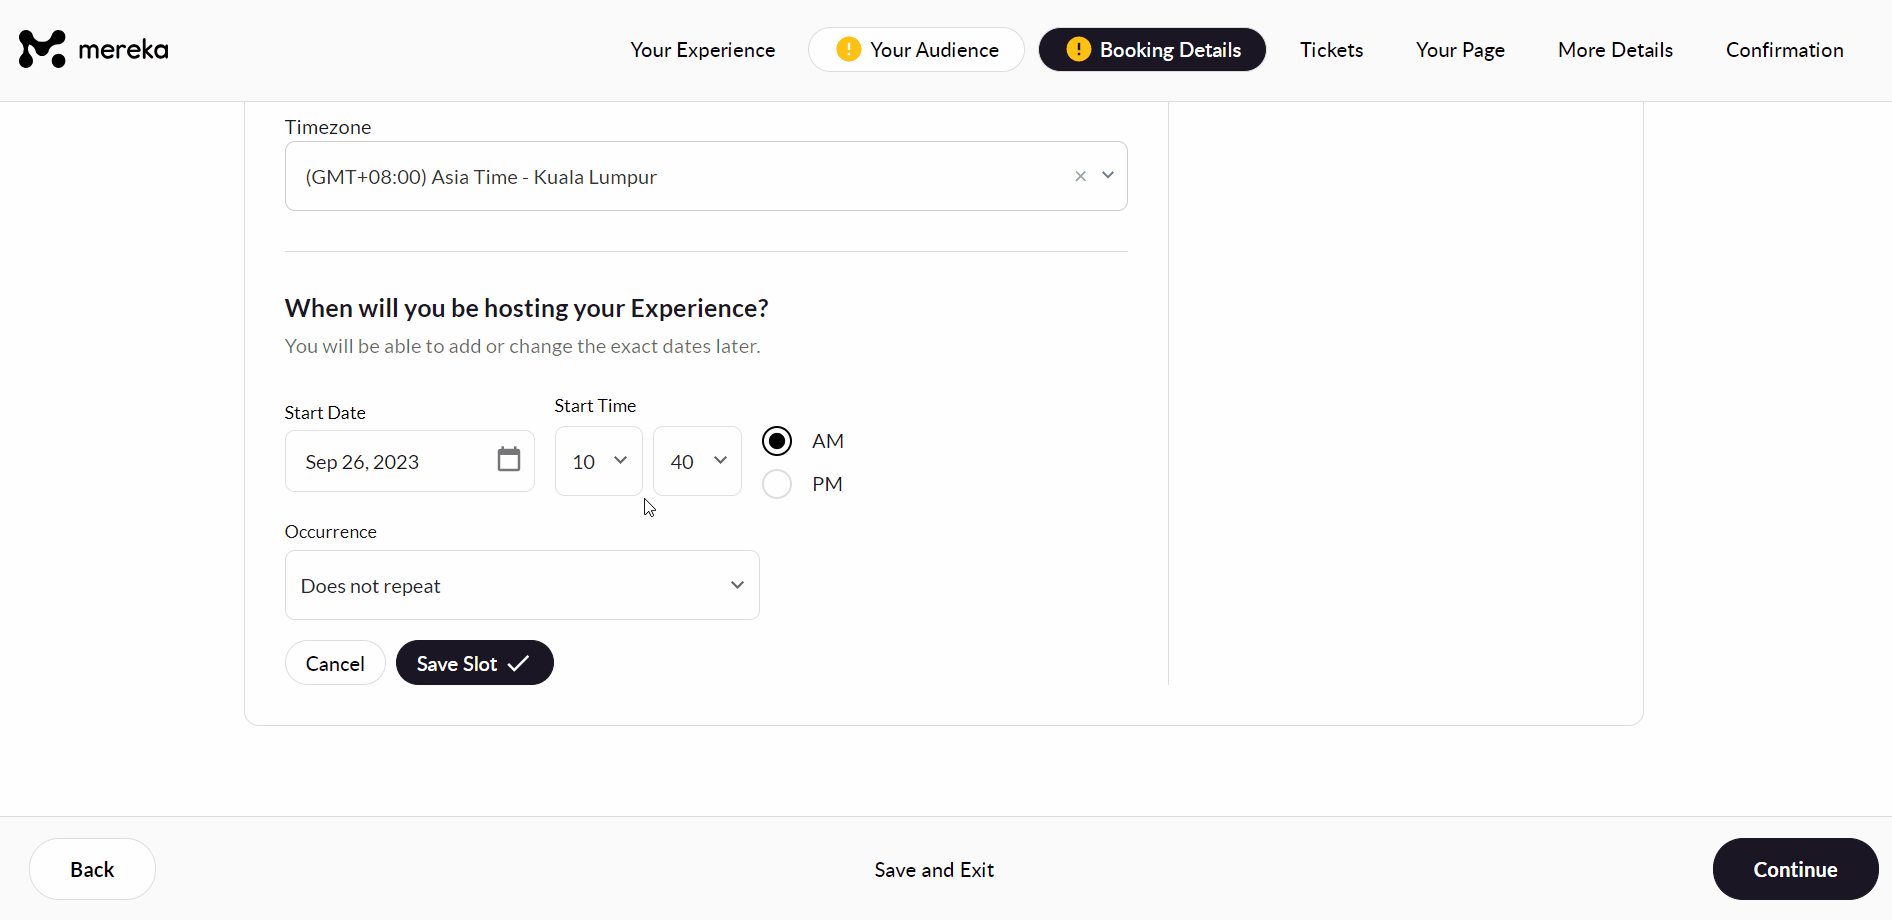
Set up a schedule for your Experience. If you’re hosting a one-off session, you may choose the date and time, and save the slot accordingly. If your Experience is recurring, you may choose for it to repeat according to various scenarios, including a custom schedule. Don’t forget to save all your slots so that they reflect properly on the booking page later!
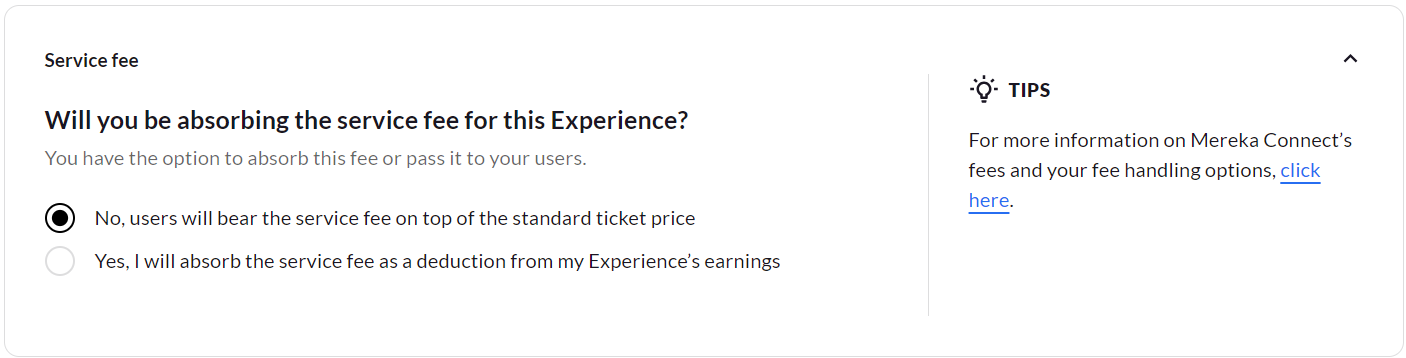
Service Fee
The Service fee is the fee that is being charged by our payment gateway. You have the option to choose if you want to let your users pay the fee, or to absorb the fee on to yourself (this will be deducted from your earnings). The majority of our Hubs do just let the users pay the fee, as it is a nominal amount. To learn more about the fees on Mereka Connect, please read this.
Ticket Type
Ticket Types is where you can customise the types of tickets you want to provide for your Experience. Service fee is the fee that is being charged by our payment gateway. To add a new ticket, press the “Paid”, “Free”, or “Private Group” buttons at the bottom of the “Ticket Type” section.
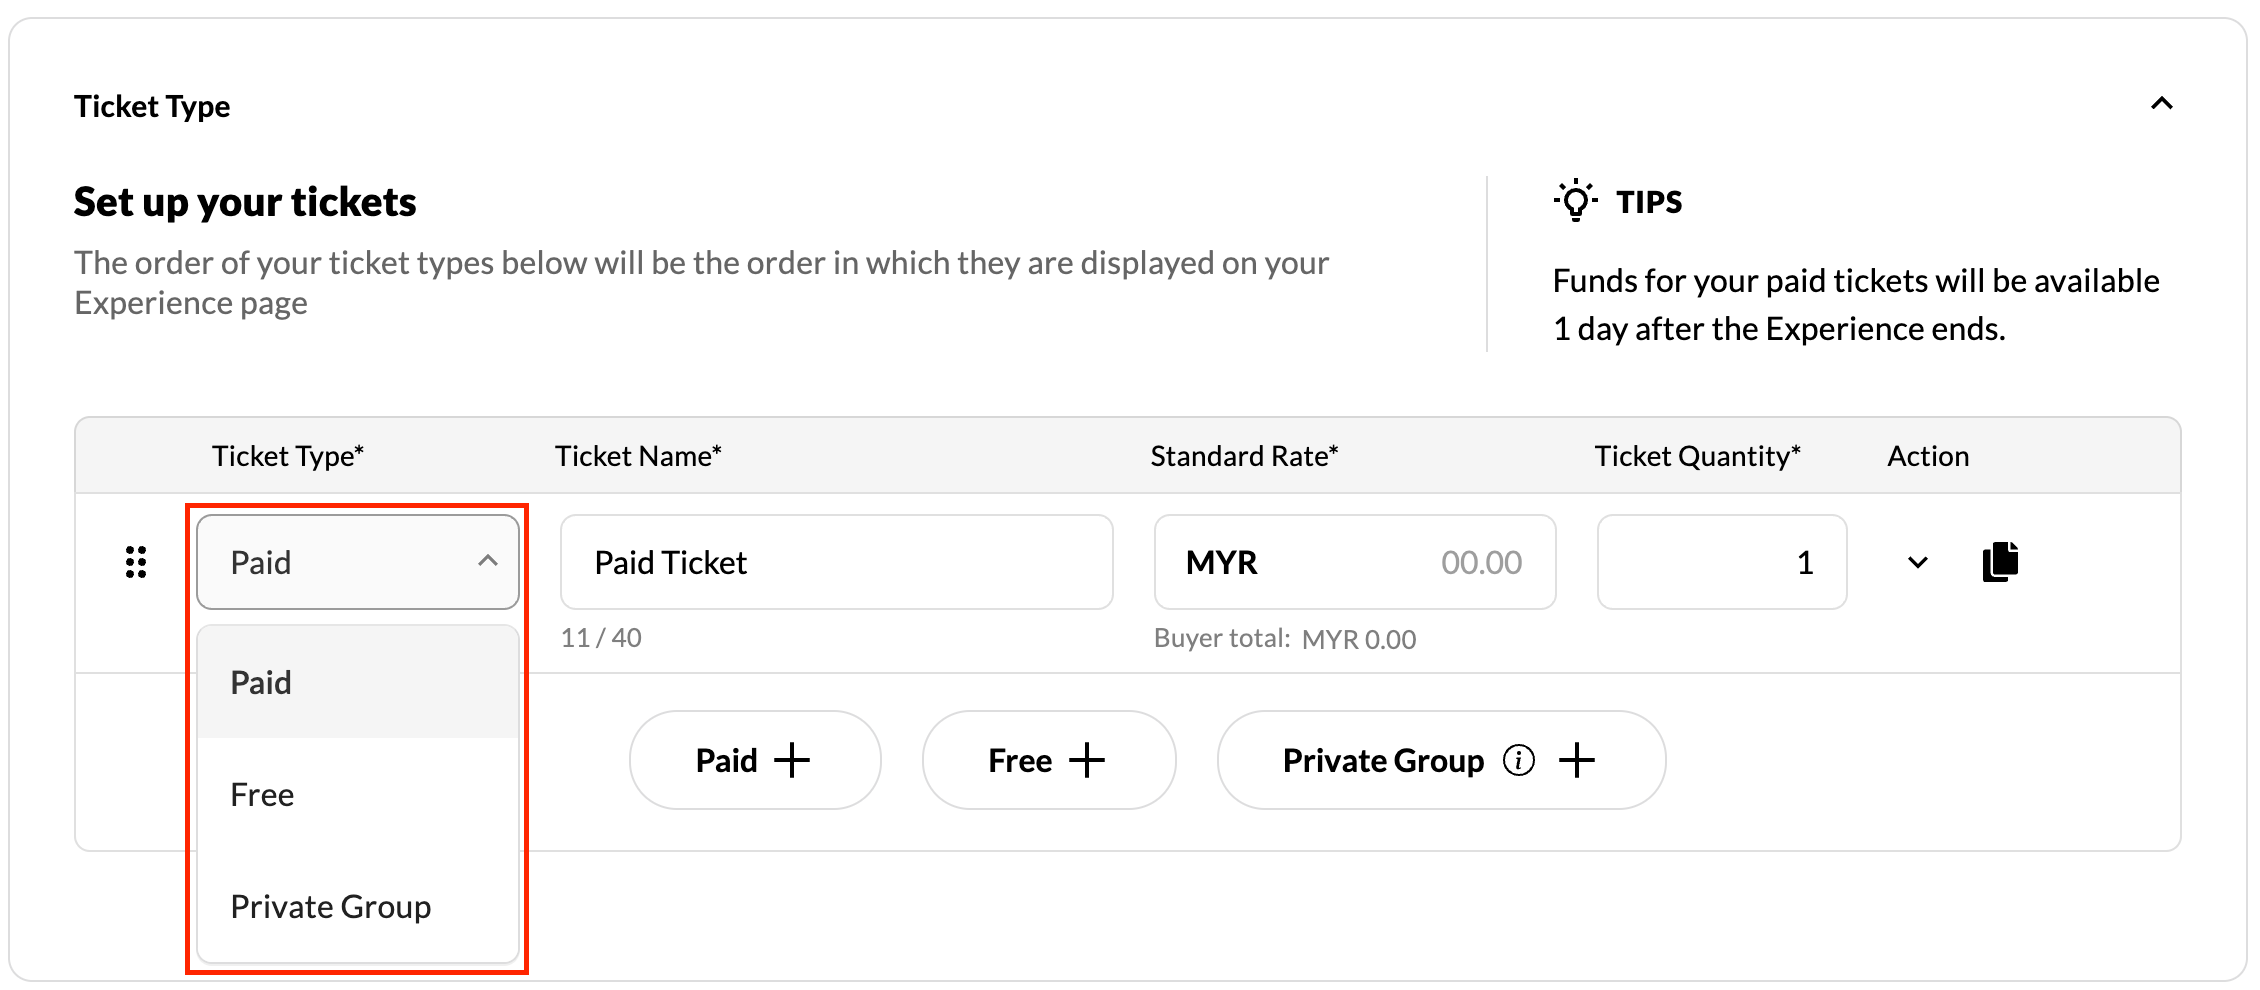
Each ticket type consists of several details:
Ticket type: Choose between free, paid, and private group ticket types.
Ticket name: Write a name for your ticket (not more than 40 characters long).
Standard rate: Set a specific price for your ticket.
Max capacity: Set a number of tickets available for each ticket type.
Cutoff time: Set a time at which the ticket will become unavailable for booking. You can set a cutoff time of a certain number of hours, days, or weeks before your Experience starts.
Description (optional): Tell users more about this ticket. You can include the services and features you are offering for the ticket here. The description should also be concise (not more than 200 characters long)
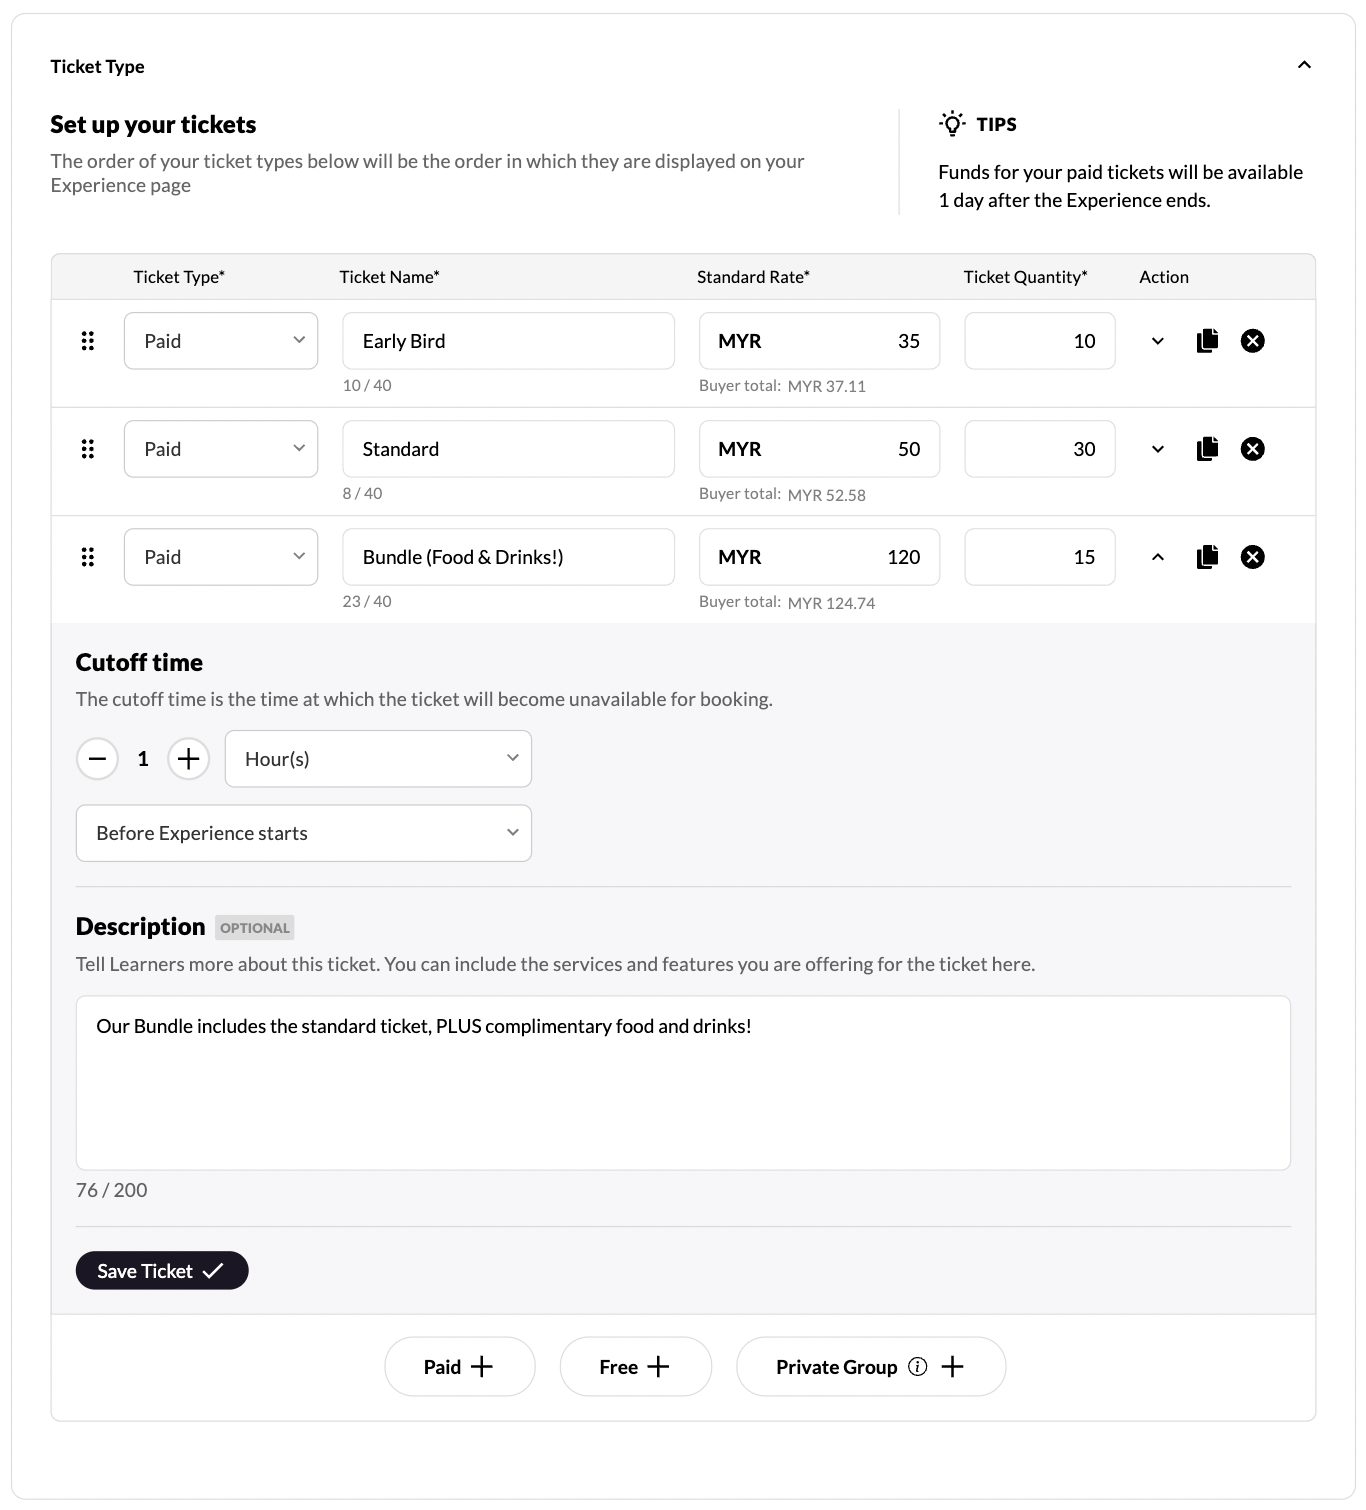
You can refer to our Ticket Types article for more information on this feature!
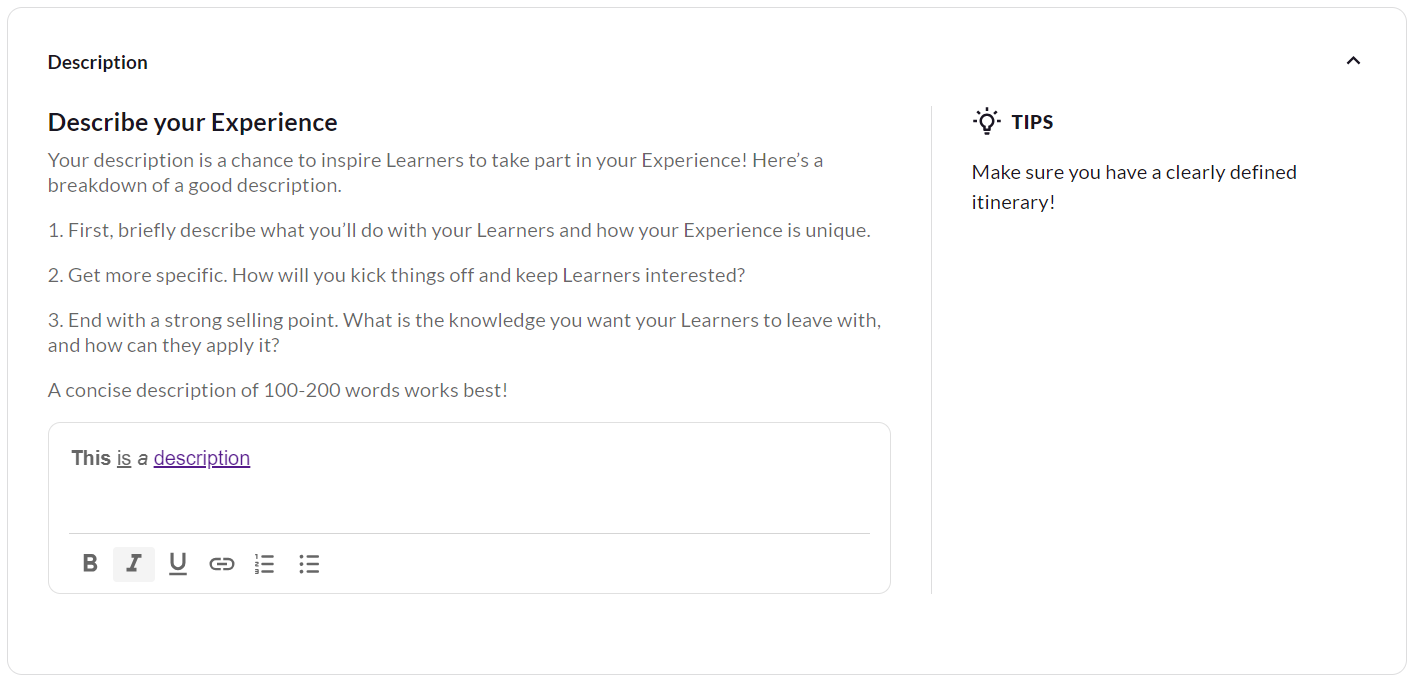
Description
Provide an engaging description for your Experience. The guidelines and tips in this section would help you structure it better and shed light on the content you need to input. The field here also allows for rich text, enabling you to use different styles to write your description.
Photos
Adding photos of your Experience is a great way to capture the attention of your users’ curious minds! Make sure to add one cover photo and at least 3-4 high-quality gallery images. Our team reviews all photos, so click here to find out how to take great photos that meet our requirements, as well as choose appropriate images for online Experiences! Please note that we do not allow posters or any other images with many text on them.

Learning Outcomes and Instructions
List at least 3 learning outcomes for your Experience. These could be the summary of your Experience description in the form of bullet points.
Help your users prepare for your Experience by providing clear instructions. Refer to the descriptions and tips on the right to understand the kind of guidelines that are relevant. The “Instructions” section will appear in the users’ booking confirmation email, so if you have any external links (eg; survey form, meeting link), it will be a good idea to put them here.
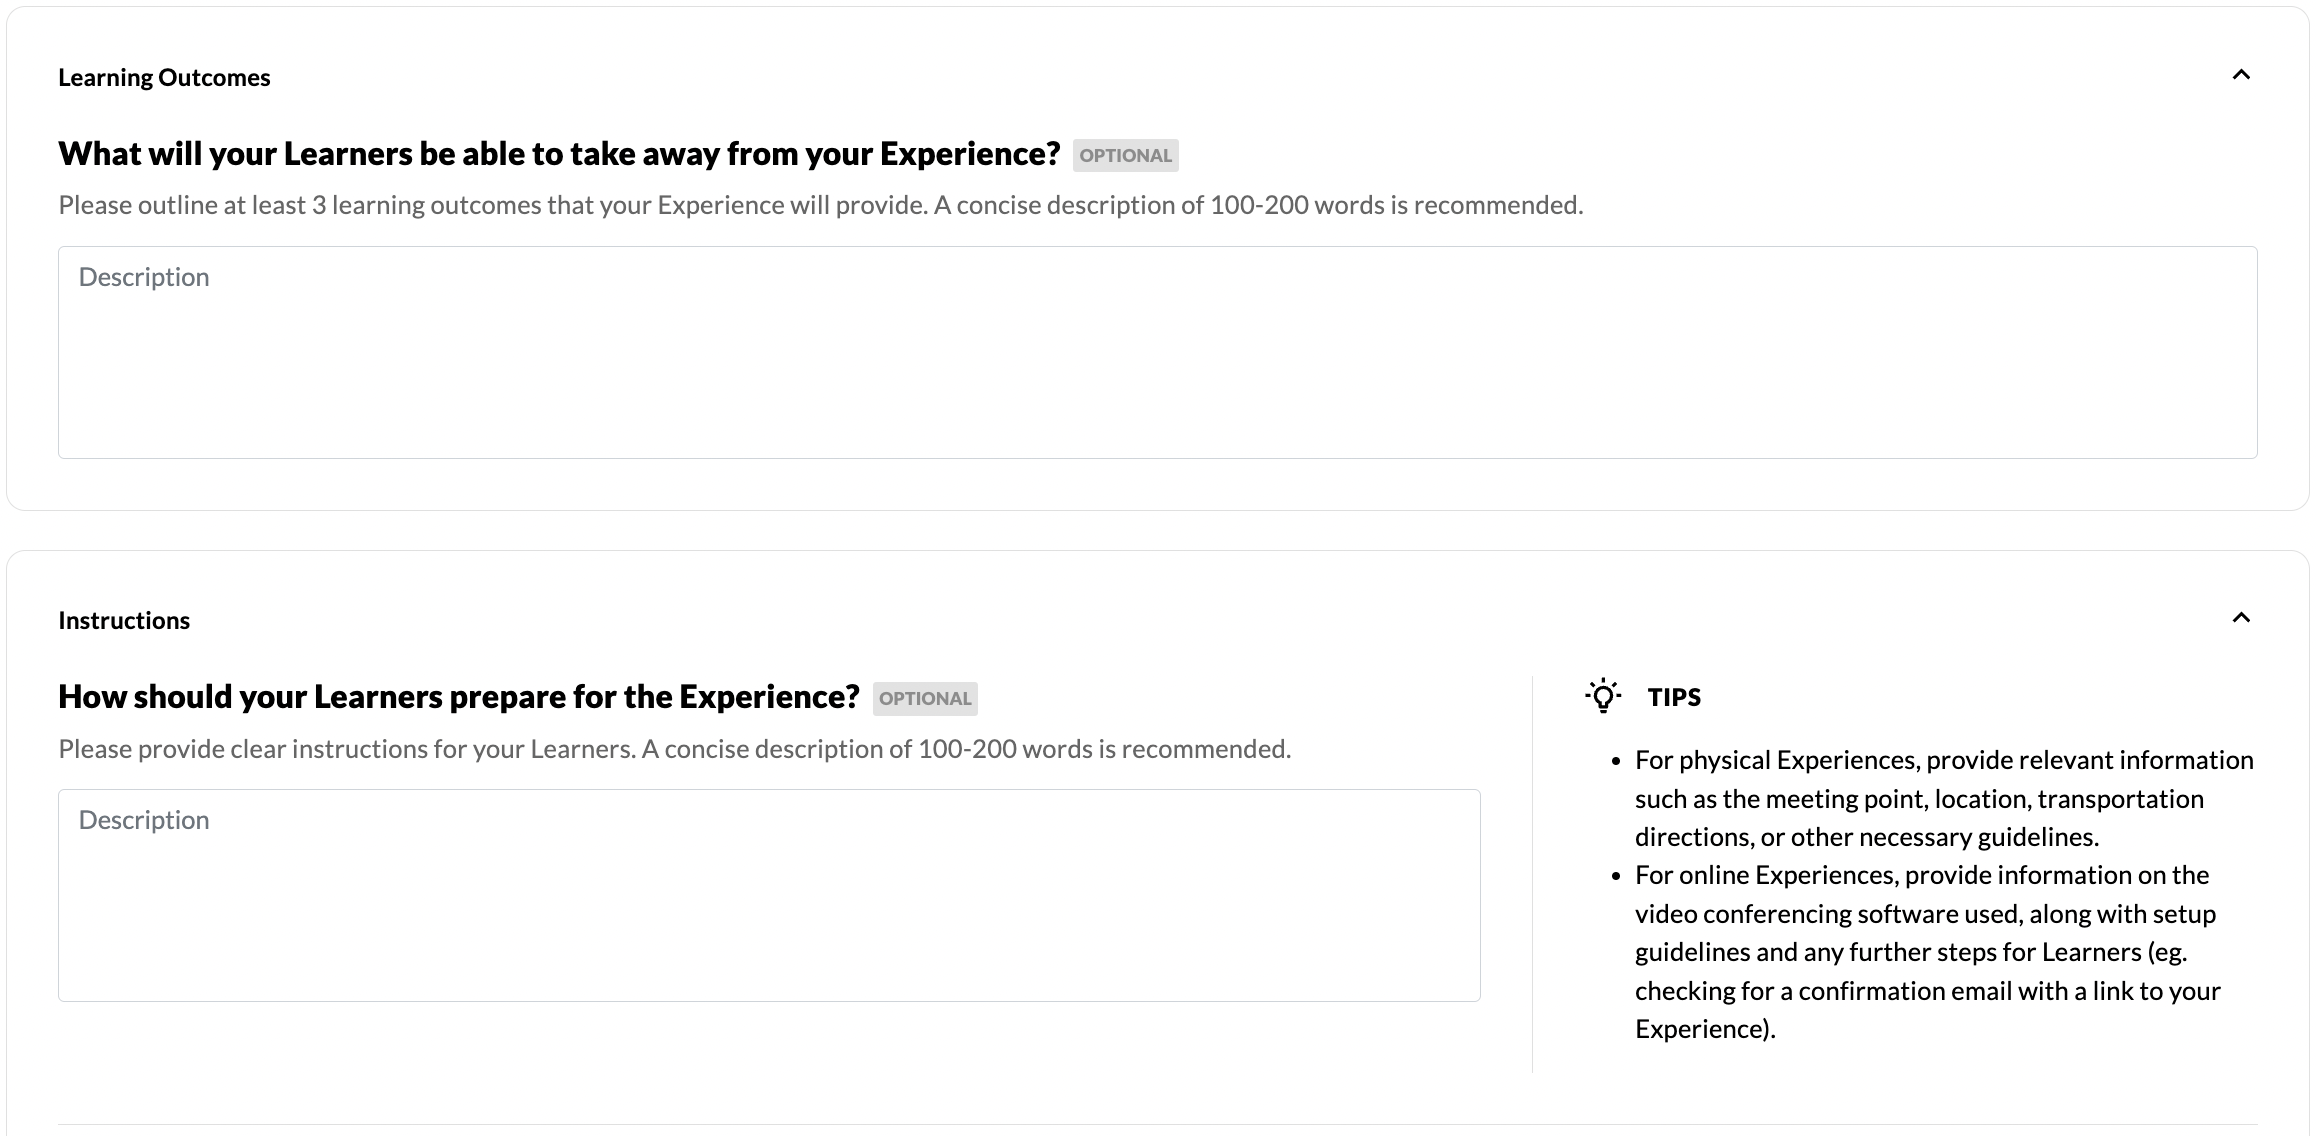
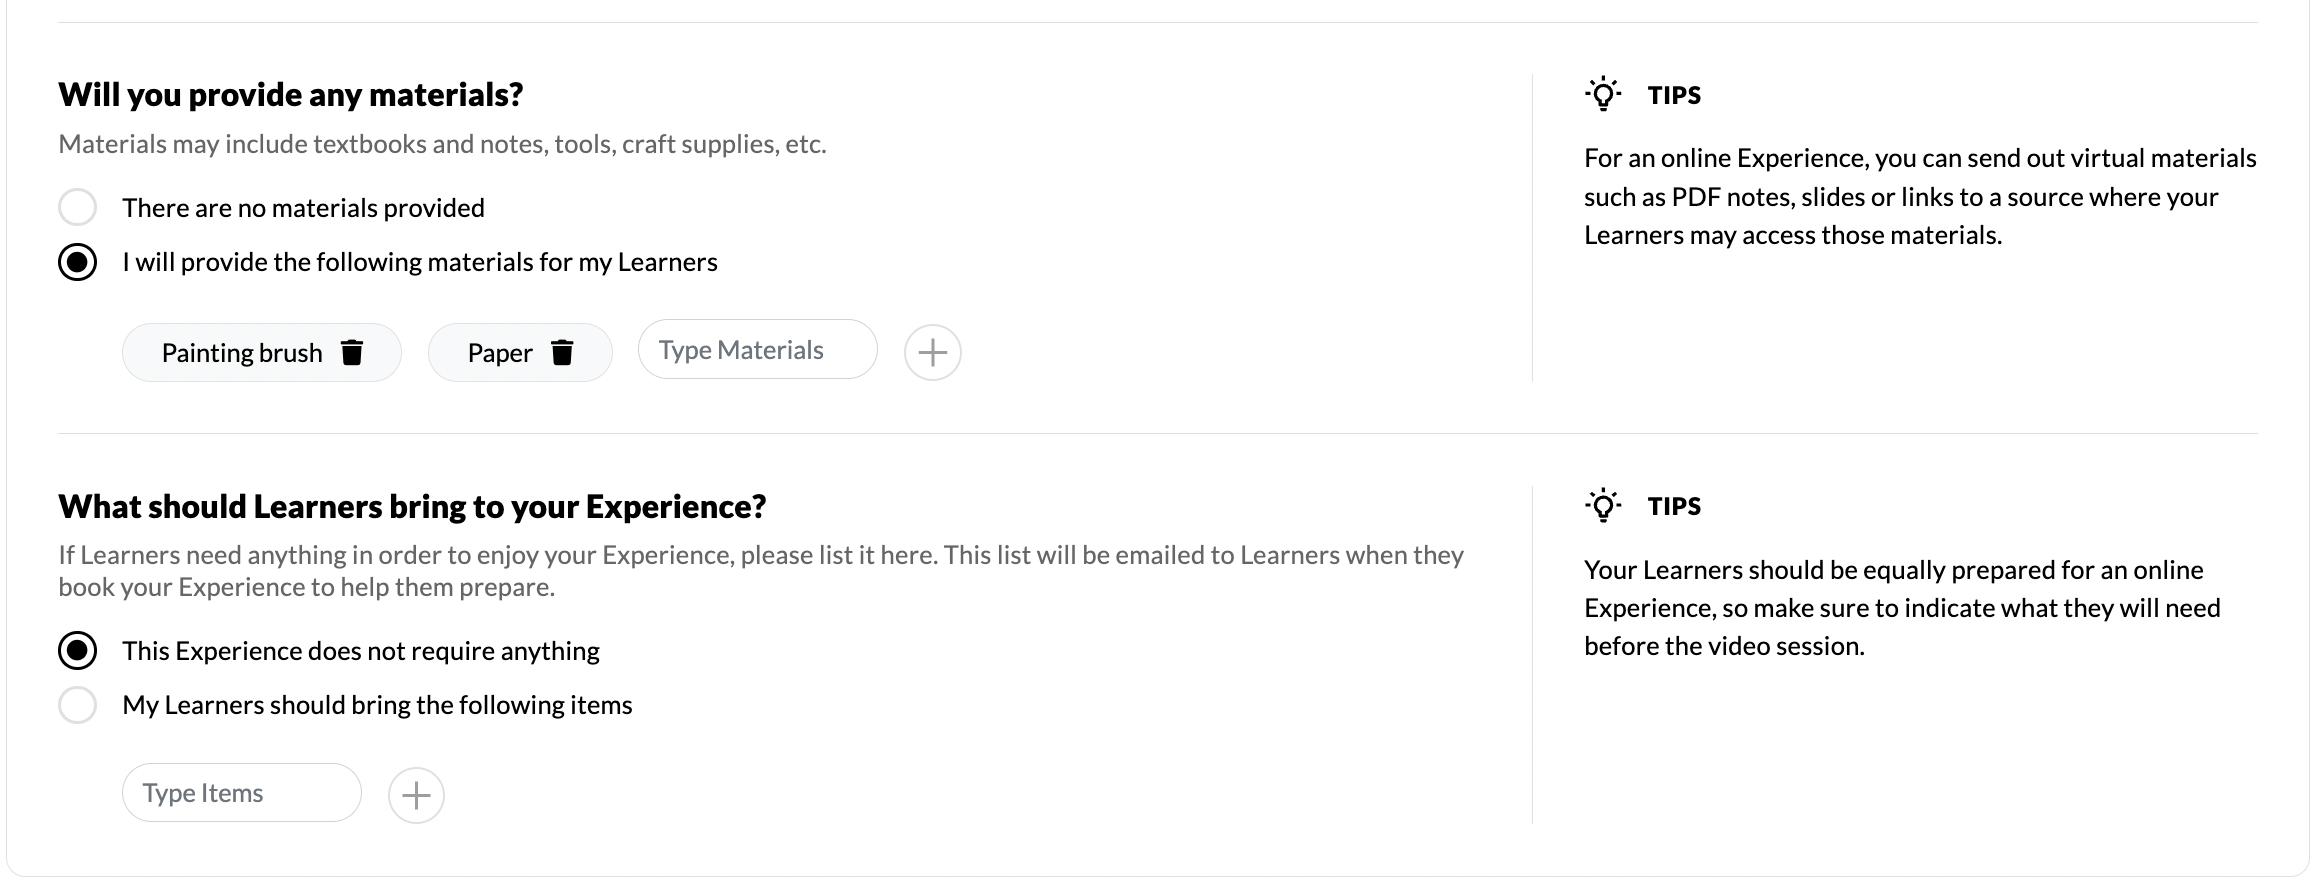
If you intend to provide materials, please indicate them by typing in the tag box and clicking the plus sign.
Make sure your users come prepared! If they need anything in order to enjoy your Experience, please select “My Learners should bring the following items” and specify the items. If your Experience is conducted online, please follow the tips on the right-hand side of the form.
Experience Poster
Attach a poster related to your Experience to provide more details to your users. An example of this may be a promotional poster of any kind that you would circulate through social media. Alternatively, you may use it to showcase any future events that you would like to highlight. 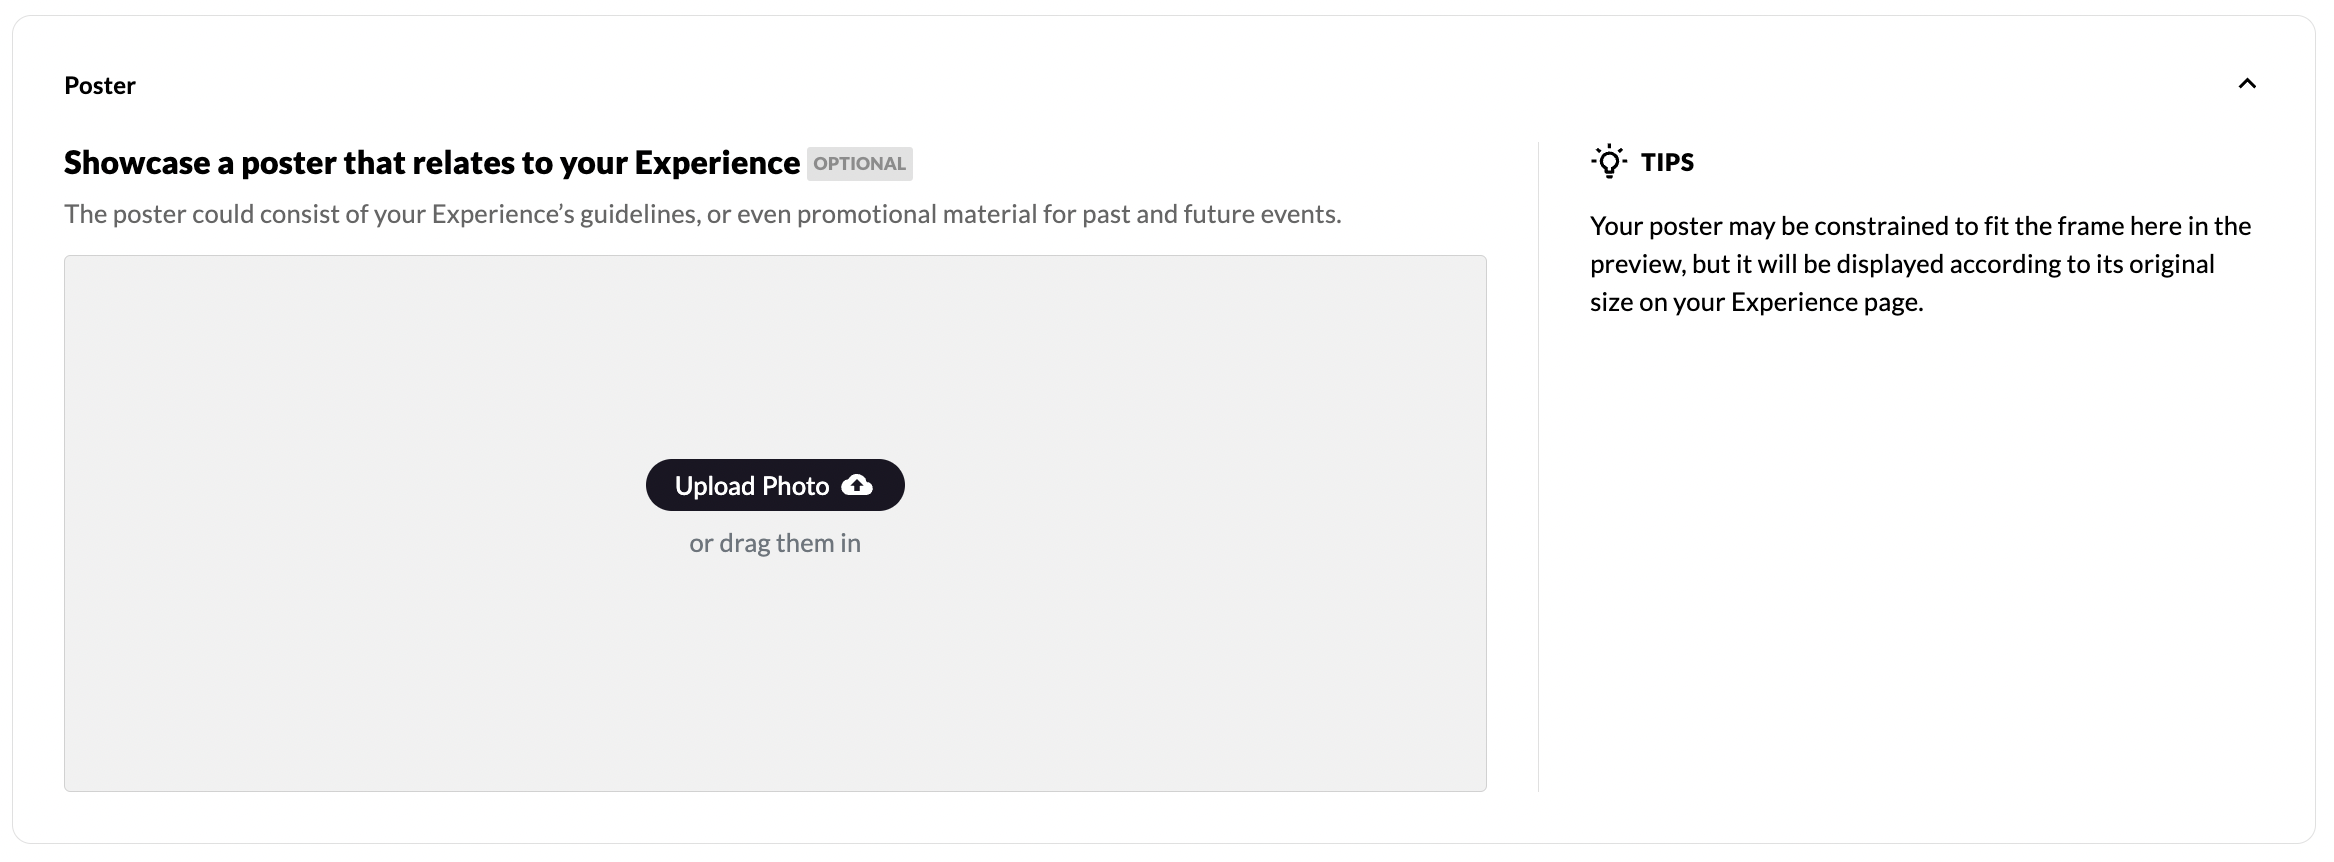
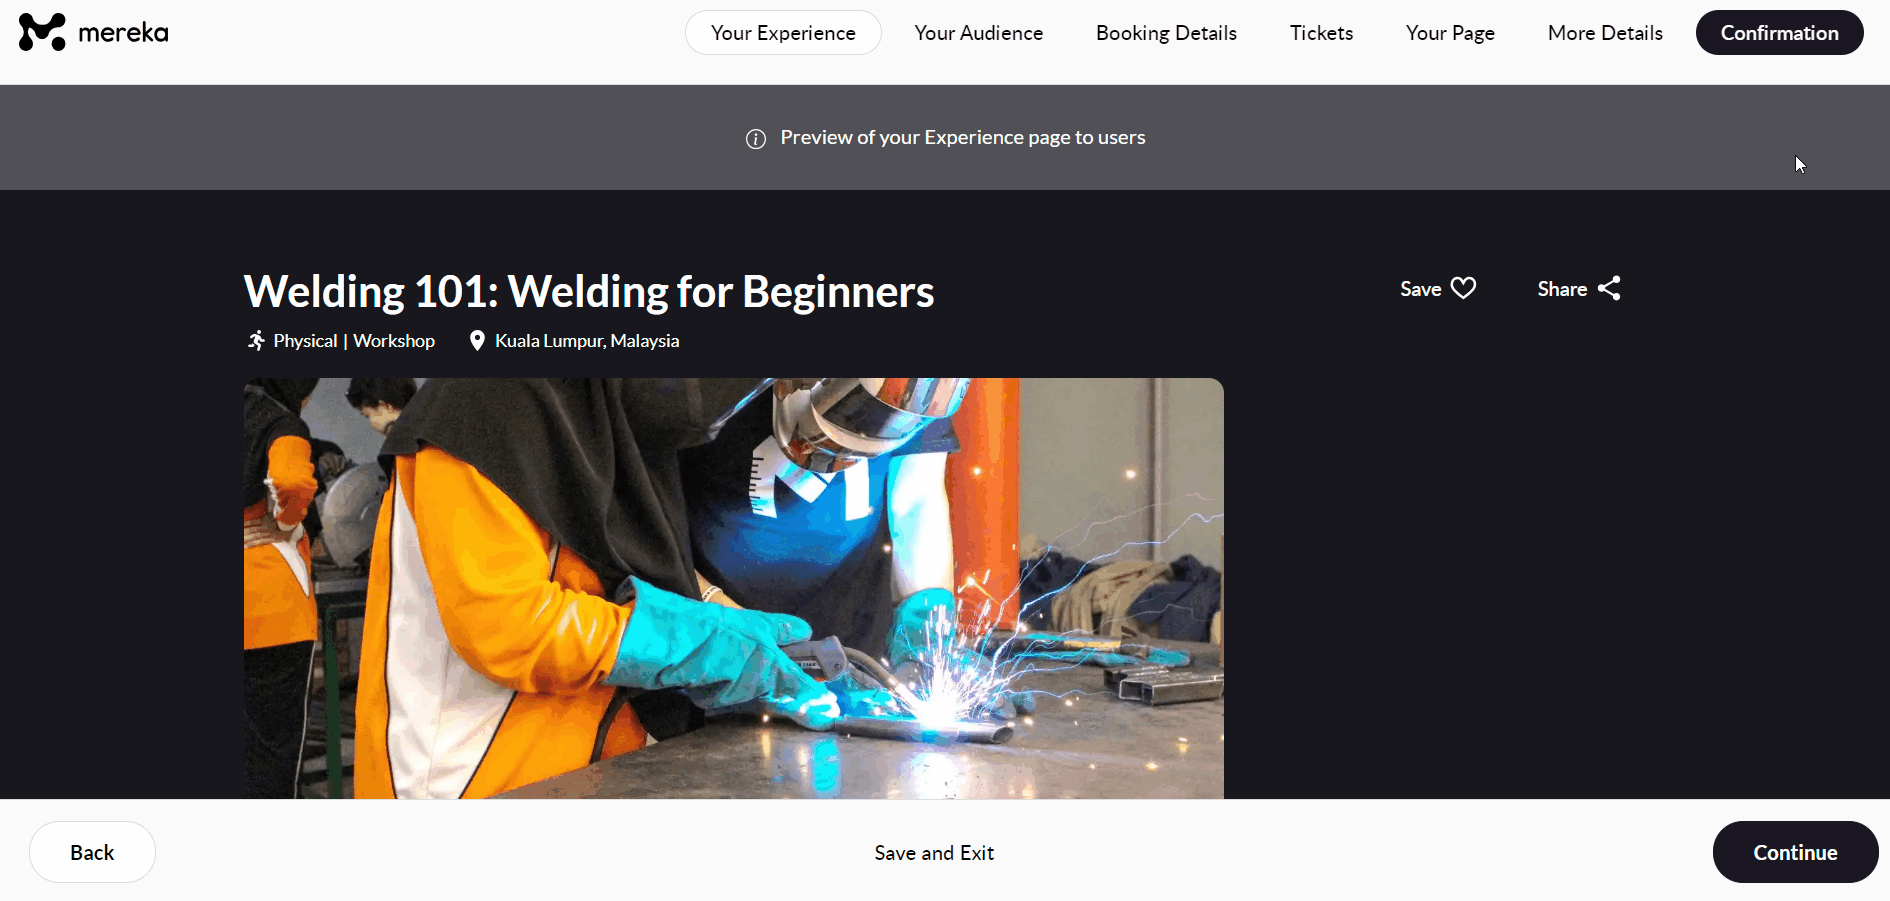
Confirmation
Preview your Experience page and ensure there are no typos or formatting errors, and all the information you’ve provided is accurate.
If you’d like to edit something, you may always navigate to the section of your choice by clicking the “Back” button or selecting the relevant section on the top bar.
Once you’re happy with your Experience page, click “Continue”.
Congratulations! Your Experience form has been submitted!
All Experiences are carefully reviewed by the Mereka Connect team to ensure they meet our requirements and quality standards. To learn about what makes a successful Experience (and what doesn’t!), please follow this link.
You will be notified within 1-2 working days on the outcome of your application, so do keep an eye on your inbox! If you have any further questions and would like to speak to a member of our team, please contact us via team@mereka.io.